あて、アプリを開発するにあたっては、pythonのDjangoというWebアプリフレームワークを使っていきます。統合開発環境(IDE)はPycharmを使用していきます。また、DBサーバーはPostgreSQLを使用します。pythonやPycharm、PostgreSQLのインストールについては、ずいぶん前ではありますが、記事を上げているので、そちらを参照してください。
まず、Pycharmで作業を進めます。
1.プロジェクトの作成
「新規プロジェクト」をクリックし、プロジェクトを新規作成します。

2.プロジェクトの保存先とプロジェクト名をLocationにパスとして入力し、「作成」をクリックします。
今回は、Cドライブ直下に作成した「python_projects」というフォルダに「work_flow」という名のプロジェクトを作成します。
3.「ファイル」→「設定」をクリックします。

4.必要なパッケージをインストールする画面を開きます。
「プロジェクト:work_flow」→「python インタープリター」をクリックします。

5.まずは一覧左上の「+」をクリックします。

6.必要なパッケージをインストールします。
今回は「Django」と「psycopg2」をインストールします。
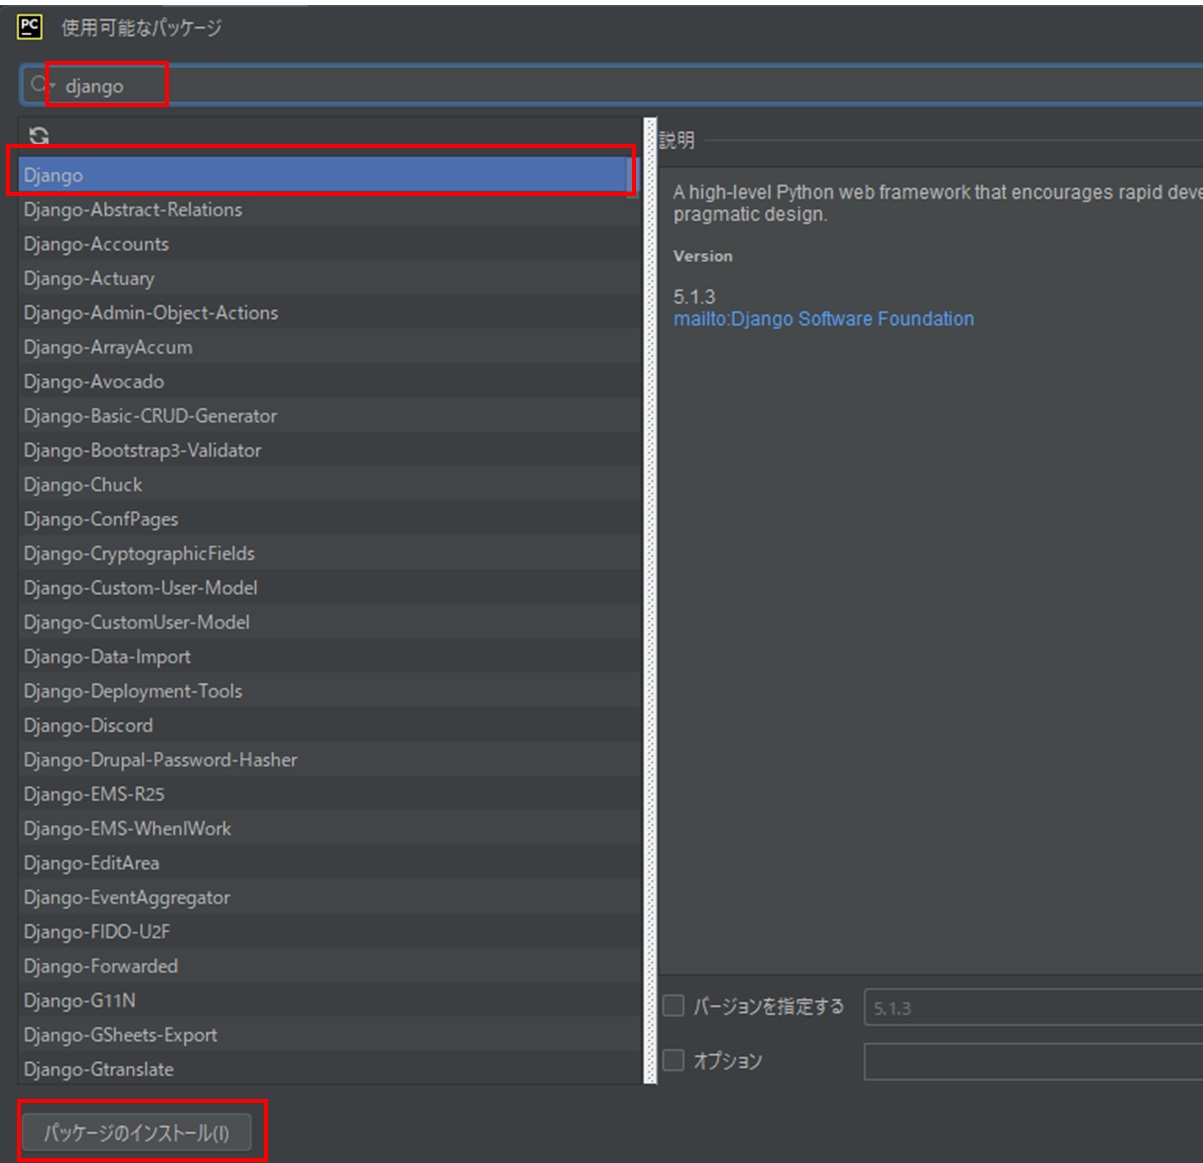
・「Django」のインストール
検索欄に「django」と入力し、一覧に表示された「Django」を選択してから、「パッケージのインストール」をクックします。
・「psycopg2」のインストール
検索欄に「psycopg2」と入力し、一覧に表示された「」を選択してから、「パッケージのインストール」をクックします。

7.インストールが完了したら、右上の「×」をクリックします。
8.必要なパッケージ(「Django」と「psycopg2」)がインストールされているのを確認したら「OK」をクリックします。

9.下にある「pythonコンソール」をクリックします。

10.「import django」と入力し、「Enter」キーを押します。

.jpg)
12.下にある「ターミナル」をクリックします。

13.「django-admin startproject mysite .」と入力し、「ENTER」キーを押します。「mysite」というプロジェクトを作成します。

14.左上のツリーの部分に「mysite」が作成されます。


16.「http://127.0.0.1:8000/」部分をクリックするか、ブラウザのアドレス入力欄に「http://127.0.0.1:8000/」を入力します。

17.以下の画像のページが表示されれば、プロジェクト作成まで完了です。

18.ターミナルで、「Cntl + C」でサーバーを停止させます。
赤枠の表示がされれば、開発環境用のWebサーバーは停止状態です。

19.「pyhton manage.py startapp wf」と入力し、「ENTER」キーを押します。「wf」というプロジェクトを作成します。wfはworkflowの略です。

20.左上のツリーの部分に「wf」が作成されます。

21.「mysite」→「settings.py」をクリックして、settins.pyを編集します。

22.内容は以下のようにします。
"""
Django settings for mysite project.

Generated by 'django-admin startproject' using Django 4.2.16.

For more information on this file, see
https://docs.djangoproject.com/en/4.2/topics/settings/

For the full list of settings and their values, see
https://docs.djangoproject.com/en/4.2/ref/settings/
"""

import os
from pathlib import Path

# Build paths inside the project like this: BASE_DIR / 'subdir'.
BASE_DIR = Path(__file__).resolve().parent.parent


# Quick-start development settings - unsuitable for production
# See https://docs.djangoproject.com/en/4.2/howto/deployment/checklist/

# SECURITY WARNING: keep the secret key used in production secret!
SECRET_KEY = 'django-insecure-m!ac$7q)7(h)ig0wny@v+obe+7s^1pz2l0l)y==@msyyb33^m4'

# SECURITY WARNING: don't run with debug turned on in production!
DEBUG = True

ALLOWED_HOSTS = ['*']


# Application definition

INSTALLED_APPS = [
    'django.contrib.admin',
    'django.contrib.auth',
    'django.contrib.contenttypes',
    'django.contrib.sessions',
    'django.contrib.messages',
    'django.contrib.staticfiles',
    'wf.apps.WfConfig',
]

MIDDLEWARE = [
    'django.middleware.security.SecurityMiddleware',
    'django.contrib.sessions.middleware.SessionMiddleware',
    'django.middleware.common.CommonMiddleware',
    'django.middleware.csrf.CsrfViewMiddleware',
    'django.contrib.auth.middleware.AuthenticationMiddleware',
    'django.contrib.messages.middleware.MessageMiddleware',
    'django.middleware.clickjacking.XFrameOptionsMiddleware',
]

ROOT_URLCONF = 'mysite.urls'

TEMPLATES = [
    {
        'BACKEND': 'django.template.backends.django.DjangoTemplates',
        'DIRS': [os.path.join(BASE_DIR, 'templates')],
        'APP_DIRS': True,
        'OPTIONS': {
            'context_processors': [
                'django.template.context_processors.debug',
                'django.template.context_processors.request',
                'django.contrib.auth.context_processors.auth',
                'django.contrib.messages.context_processors.messages',
            ],
        },
    },
]

WSGI_APPLICATION = 'mysite.wsgi.application'


# Database
# https://docs.djangoproject.com/en/4.2/ref/settings/#databases

DATABASES = {
    'default': {
        'ENGINE': 'django.db.backends.postgresql_psycopg2',
        'NAME': 'wf',
        'USER': 'django_user',
        'PASSWORD': 'password',
        'HOST': 'localhost',
        'PORT': '',
    }
}


# Password validation
# https://docs.djangoproject.com/en/4.2/ref/settings/#auth-password-validators

AUTH_PASSWORD_VALIDATORS = [
    {
        'NAME': 'django.contrib.auth.password_validation.UserAttributeSimilarityValidator',
    },
    {
        'NAME': 'django.contrib.auth.password_validation.MinimumLengthValidator',
    },
    {
        'NAME': 'django.contrib.auth.password_validation.CommonPasswordValidator',
    },
    {
        'NAME': 'django.contrib.auth.password_validation.NumericPasswordValidator',
    },
]


# Internationalization
# https://docs.djangoproject.com/en/4.2/topics/i18n/

LANGUAGE_CODE = 'ja'

TIME_ZONE = 'Asia/Tokyo'

USE_I18N = True

USE_TZ = True


# Static files (CSS, JavaScript, Images)
# https://docs.djangoproject.com/en/4.2/howto/static-files/

STATIC_URL = 'static/'
STATIC_ROOT = os.path.join(BASE_DIR, 'static')

LOGOUT_REDIRECT_URL = '/wf/'

# Default primary key field type
# https://docs.djangoproject.com/en/4.2/ref/settings/#default-auto-field

DEFAULT_AUTO_FIELD = 'django.db.models.BigAutoField'
以上で、Django側の環境設定が完了です。
次に、pgAdmin4でpostgreSQLの設定作業を進めます。
最初にpostgreSQLのに「django_user」を作成します。
1.対象のpostgreSQLの「ログイン/グループロール」を右クリックし、「作成」をクリックします。
※すでに「django_user」ができているので、今回は「django_user2」の作成で説明します。

2.名前欄に「django_user2」と入力し、「定義」タブをクリックします。

3.パスワード欄に「password」と入力し、「権限」タブをクリックします。
※パスワード欄にはsetteings.pyの「DATABASE」の項目に設定したパスワードを入力します。

4.すべての項目を「ON」にし、「保存」をクリックします。

次にpostgreSQLのに「fw」というdbを作成します。
1.「データベース」を右クリックし、「作成」→「データベース」をクリックします。

2.データベース欄に「wf」と入力し、所有者に「django_user」を選択して、「保存」をクックします。

以上で、postgreSQL側の環境設定が完了です。
いよいよ、次回からアプリの作成に入っていきます。
0 件のコメント:
コメントを投稿